



Deployment Image Servicing and Management (DISM) is an integral part of the Windows operating system, serving as a powerful tool for system administrators and IT professionals. This article delves into the depths of DISM, exploring its functionalities, uses, and critical role in maintaining the health and efficiency of Windows systems.
At its core, DISM provides a command-line interface for servicing Windows images, including Windows Imaging Format (WIM) files and Virtual Hard Disks (VHDs). It’s essential for preparing Windows installation environments, modifying images, performing recovery operations, and running hardware diagnostics.
DISM is equipped with a myriad of features. It can enable or disable Windows features, update drivers, apply updates, and even repair corrupted Windows installations. These functionalities are crucial for maintaining the integrity and up-to-dateness of Windows installations.
How to Repair Windows Images with DISM
DISM can scan and repair corruption in Windows images, ensuring system stability and security. Follow these step-by-step instructions:
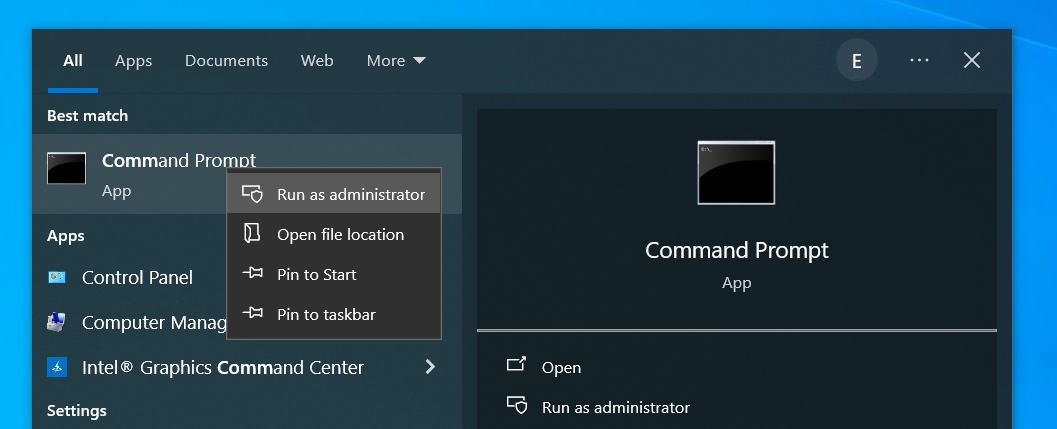
- Open Command Prompt as Administrator
- Press the Windows key, type cmd or Command Prompt.
- Right-click on Command Prompt and select Run as administrator. This step is crucial as DISM requires administrative privileges.
- Check the Windows image for corruption
- Enter the following command:
DISM /Online /Cleanup-Image /CheckHealth. This command checks the image for corruption without fixing any issues.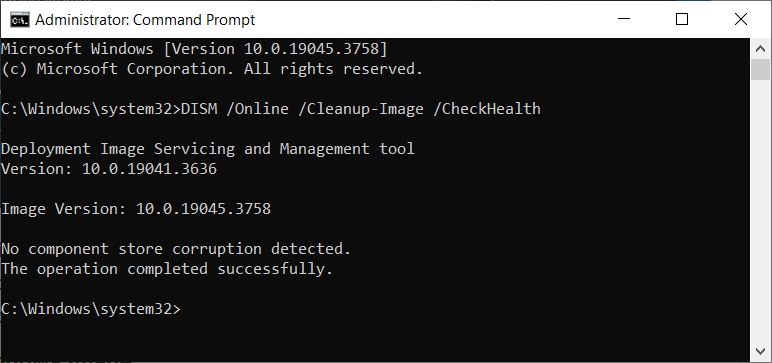
- Enter the following command:
- Scan the Windows image
- Perform a more advanced check by using:
DISM /Online /Cleanup-Image /ScanHealth. This scans the image for component store corruption. This process can take several minutes.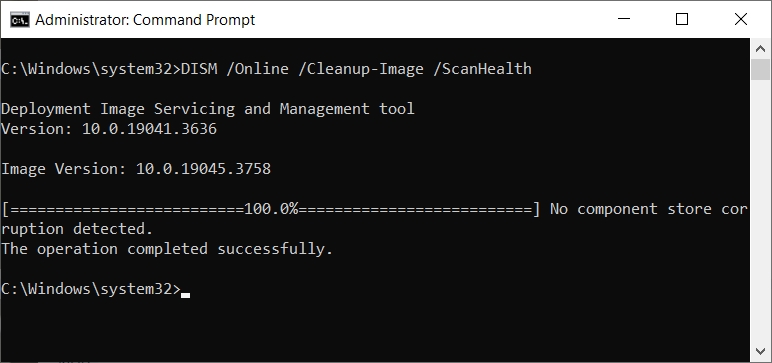
- Perform a more advanced check by using:
- Repair the Windows image
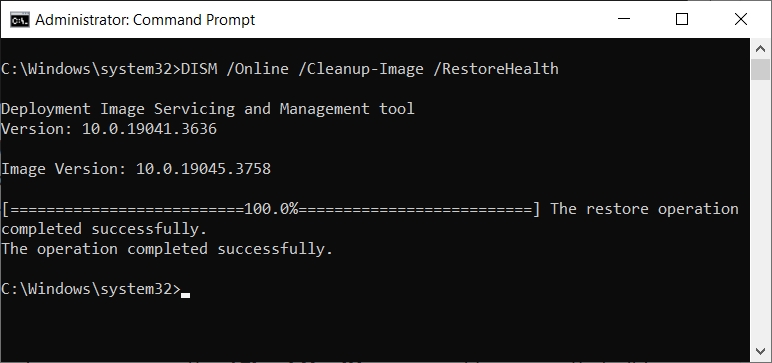
- To fix the corruption, use:
DISM /Online /Cleanup-Image /RestoreHealth. This command repairs any detected corruption from Windows Update servers. - Ensure you have an active internet connection, as DISM may need to download clean versions of corrupted files.
- To fix the corruption, use:
- Recheck the Windows image
- After the repair process, rerun the /CheckHealth command to ensure that all issues have been resolved.
- Restart your computer
- Once the repair is complete and no further issues are detected, restart your computer to apply the changes effectively.


Additional Tips
- Windows Update Troubleshooter: For issues related to Windows updates, the built-in Windows Update Troubleshooter can be a helpful tool.
- Using an external source for repairs: If DISM can’t fix the files from Windows Update, you might need to specify an alternative source for the files. This can be a Windows installation disk or a WIM file. Use the following command, replacing source with the path to your repair source –
DISM /Online /Cleanup-Image /RestoreHealth /Source:C:\YourRepairSource\Windows /LimitAccess - Check DISM version: Ensure you have the latest version of DISM by keeping your Windows up to date. DISM capabilities can vary slightly between Windows versions.
- Logging: DISM logs its operations, which can be helpful for troubleshooting. You can find the log file at
C:\Windows\Logs\DISM\dism.log. If you encounter issues, consult the dism.log file and seek assistance from Windows support forums. - System File Checker: After using DISM, running the System File Checker (SFC) tool can further help fix any remaining issues. Use the command
sfc /scannowin Command Prompt.
How to Manage Windows Features with DISM
Enabling and disabling operating system features using DISM is a powerful way to customize your Windows installation. Here are step-by-step instructions for doing so:
- Open Command Prompt as Administrator
- Press the Windows key, type Command Prompt.
- Right-click on Command Prompt and select Run as administrator.
- List all available features
- To see all available features in the Windows image, type
DISM /Online /Get-Features. This command will list all features with their current state (enabled or disabled).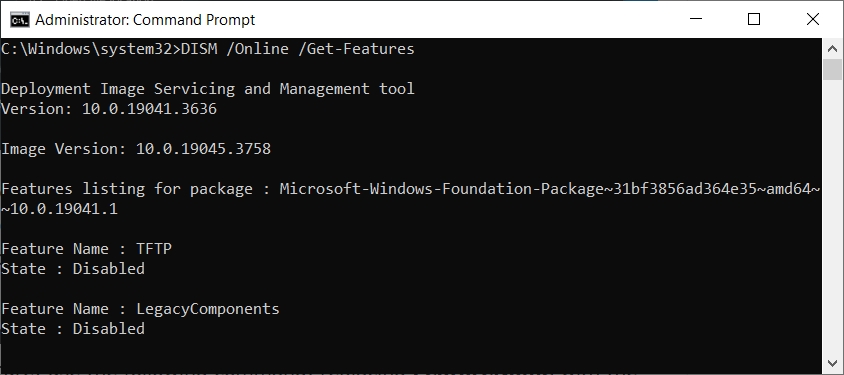
- To see all available features in the Windows image, type
- Enable a specific feature
- To activate a feature, use the following command, replacing NAMEOFTHEFEATURE with the actual name of the feature:
DISM /Online /Enable-Feature /FeatureName:NAMEOFTHEFEATURE. For example,DISM /Online /Enable-Feature /FeatureName:TFTP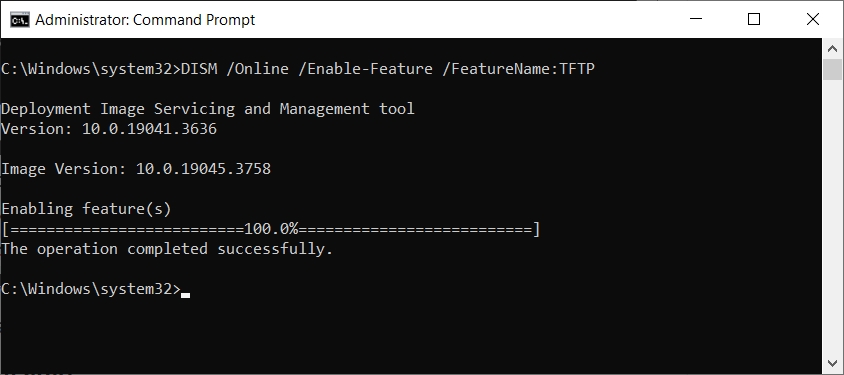
- Optionally, you can add
/Allto enable all required dependencies.
- To activate a feature, use the following command, replacing NAMEOFTHEFEATURE with the actual name of the feature:
- Disable a specific feature
- Similarly, to turn off a Windows feature, use
DISM /Online /Disable-Feature /FeatureName:NAMEOFTHEFEATURE. For example,DISM /Online /Disable-Feature /FeatureName:NAMEOFTHEFEATURE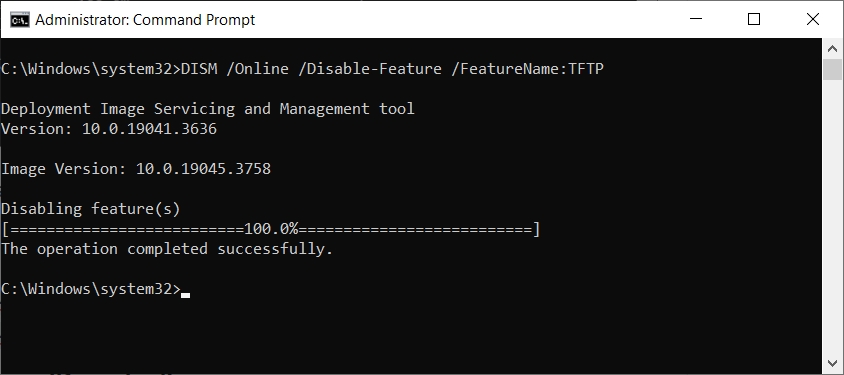
- Similarly, to turn off a Windows feature, use
- Restart the computer (if required)
- Some feature changes may require a system reboot to take effect.

How to Manage Drivers with DISM
- Add drivers to a Windows image
- To add a driver to the image, use
DISM /Online /Add-Driver /Driver:<driver_path> /ForceUnsigned - Replace <driver_path> with the path to your driver file.
- /ForceUnsigned is optional and allows the addition of drivers without a digital signature.
- To add a driver to the image, use
- Remove drivers
- To remove a driver, first list all drivers with:
DISM /Online /Get-Drivers - Then, remove the desired driver using its published name:
DISM /Online /Remove-Driver /Driver:<published_name> - Replace <published_name> with the actual name of the driver from the list.
- To remove a driver, first list all drivers with:
- Check for driver information
- For detailed information on a specific driver, use:
DISM /Online /Get-DriverInfo /Driver:<driver_path> - Replace <driver_path> with the path to the driver file.
- For detailed information on a specific driver, use:
Additional Tips
- Be cautious: Be careful when adding or removing drivers. Adding incompatible or unstable drivers can cause system instability.
- Backup: Consider creating a system restore point before making significant changes to your system.
- Use reliable sources: Always use drivers from trusted sources to avoid security risks.
- Restart after changes: Some modifications, especially driver updates or removals, may require a system restart to take effect.
- Check compatibility: Ensure that drivers are compatible with your version of Windows before attempting to add them.
How to Capture and Deploy System Images with DISM
Capturing and deploying system images with DISM can streamline the process of setting up multiple computers, saving time and ensuring consistency across your IT environment. Follow these step-by-step instructions:
Capturing a System Image
- Prepare the system
- Ensure the system you’re capturing is configured as needed, with all necessary applications and settings.
- Boot into a Windows Preinstallation Environment (WinPE)
- Boot the source computer into WinPE. This is necessary to capture an image of the system as it ensures the system is not in use.
- Open Command Prompt in WinPE
- Once in WinPE, open the Command Prompt.
- Capture the image
- Use the following command to capture an image:
DISM /Capture-Image /ImageFile:C:\path\to\your\image.wim /CaptureDir:C:\ /Name:"Your Image Name" - Replace C:\path\to\your\image.wim with the path and file name for the new WIM file.
- /CaptureDir:C:\ is the directory you want to capture (C:\ for the entire drive).
- /Name:”Your Image Name” is the name you give to your image.
- Use the following command to capture an image:
- Store the image
- Save the WIM file to a USB drive or a network location.
Deploying the System Image
- Prepare the target system
- Boot the target computer into WinPE, just like the source system.
- Open Command Prompt in WinPE
- Access the Command Prompt from the WinPE environment.
- Format the drive (optional)
- If needed, format the drive where you will deploy the image:
diskpart

select disk 0

clean

create partition primary size=XXXXX

format fs=ntfs quick

assign letter=C

exit- Replace XXXXX with the size of the partition you want to create, or omit size=XXXXX to use the entire disk.
- Deploy the image
- Use the following command to apply the image to the target system:
DISM /Apply-Image /ImageFile:D:\path\to\your\image.wim /Index:1 /ApplyDir:C:\ - Replace D:\path\to\your\image.wim with the path to your WIM file.
- /Index:1 usually applies unless you have a WIM file with multiple images.
- Use the following command to apply the image to the target system:
- Restart the computer
- After applying the image, restart the computer. The system should now boot into the newly applied Windows image.
Additional Tips
- Multiple partitions: If your source system has multiple partitions (like system reserved partitions), you’ll need to capture and apply each partition separately.
- System specific drivers: After deploying an image to a new system, you may need to install drivers specific to that hardware.
- Licensing: Ensure you have the appropriate licensing for deploying Windows images in your organization.
- Testing: Always test your captured image on a non-critical system before widespread deployment to ensure it functions correctly.
How to Deploy Windows Updates with DISM
Deploying Windows updates with DISM offers a high level of control and can be particularly useful for managing updates in large organizations or for offline systems. Follow these steps:
- Download the update packages
- Obtain the necessary Windows update packages (.msu or .cab files) from the Microsoft Update Catalog or other official sources.
- Open Command Prompt as Administrator
- Press the Windows key, type Command Prompt.
- Right-click on Command Prompt and select Run as administrator.
- Add the update to the image
- If you’re updating an offline Windows image, mount the image first. If you’re updating the running OS, skip this step.
- Use the following command to add the update:
DISM /Online /Add-Package /PackagePath:path\to\updatefile.cab - Replace path\to\updatefile.cab with the actual path to the update file you downloaded. For multiple updates, repeat this step for each update.
- Check for errors
- After adding each update, check for any errors in the command prompt output to ensure the update is applied correctly.
- Finalize the update
- If you updated an offline image, unmount it and commit the changes using this command:
DISM /Unmount-Image /MountDir:path\to\mount_directory /Commit - Replace path\to\mount_directory with the path to your mount directory.
- If you updated the running operating system, restart your computer to complete the update process.
- If you updated an offline image, unmount it and commit the changes using this command:
Additional Tips
- Backup first: Always backup critical data before applying updates, especially when updating the running OS.
- Test updates: Test updates on a non-critical system first to ensure they don’t cause issues.
- Multiple updates: If deploying multiple updates, add them in the order they were released for best compatibility.
- Error handling: If you encounter errors during the update process, refer to the DISM log file at C:\Windows\Logs\DISM\dism.log for troubleshooting.
- Using WSUS: If updates are managed through Windows Server Update Services (WSUS), ensure the target computers can access the WSUS server.
- Windows Update Standalone Installer: Alternatively, for online updates, you can use the Windows Update Standalone Installer (wusa.exe) to install .msu files directly.
How to Implement Task Automation with DISM
For advanced users, DISM offers scripting capabilities, allowing for automation of routine tasks and integration with other Windows deployment tools, streamlining the management process. Follow these steps:
- Identify repetitive DISM tasks
- Analyze your workflow to identify common tasks that you perform with DISM. These could include applying updates, enabling or disabling features, or managing drivers.
- Write batch scripts
- Open a text editor like Notepad.
- Write your DISM commands in the order they need to be executed. For example:
DISM /Online /Enable-Feature /FeatureName:FeatureName

DISM /Online /Add-Driver /Driver:driver_path - Save the file with a .bat extension, like DISM_Tasks.bat.
- Test your batch scripts
- Run your batch file by double-clicking it or executing it from the Command Prompt.
- Check if all tasks are completed successfully without errors.
- Schedule your batch files with Task Scheduler:
- Open Task Scheduler by searching for it in the Start Menu.
- Click Create Basic Task and follow the wizard to schedule your batch file.
- Choose when the task should start and how frequently it should run.
- When prompted for an action, choose Start a Program and browse to your batch file.
Additional Tips
- Comment your scripts: Use comments (by adding REM before your comment text in batch files) to describe each part of your script for easy understanding and maintenance.
- Advanced scripting with PowerShell: For more complex automation, consider using PowerShell scripts which offer more versatility and control.
- Error handling: Incorporate error handling in your scripts to manage unexpected issues during execution.
- Security: Ensure that your scripts do not expose any sensitive information and that they run with the necessary security privileges.
- Backup and version control: Keep backups of your scripts and consider using a version control system to track changes over time.
- DISM commands: Check out the complete list of DISM commands to thoroughly schedule your batch scripts.
Conclusion
DISM not only simplifies complex administrative tasks but also provides a higher degree of control over system management. Its ability to automate repetitive tasks further bolsters its efficiency, making it a favorite among IT professionals. However, while leveraging the power of DISM, it is imperative to consider the associated security implications and adhere to best practices to maintain the integrity and security of Windows environments.