

Device Manager is a vital tool in Windows 10 (and older) that helps users manage hardware devices connected to their computers. This built-in utility provides a comprehensive view of all installed hardware and their statuses, making it indispensable for running hardware diagnostics as well as troubleshooting and maintaining system stability.
In this article, we will explore Device Manager and its most crucial functions, including driver installation and updates, resolving device conflicts, and identifying and troubleshooting device errors.
Table of Contents
What does Device Manager do in Windows?
- List and identify devices: It shows all the hardware components and peripherals attached to the system, categorizing them for easy identification.
- Install, update, and roll back drivers: It provides options for managing device drivers, so you can install new drivers, update existing ones, and roll back to previous versions if needed.
- Enable or disable devices: Users can enable or disable specific devices, which can be useful for troubleshooting or managing power consumption.
- Troubleshoot device errors: Device Manager displays error codes and icons (e.g., yellow exclamation marks) next to malfunctioning devices, helping users identify problems quickly and access troubleshooting information.
- View device properties: It provides detailed information about each device, such as its driver details, manufacturer, and resource allocation (like IRQs and memory addresses).
- Manage system resources: Device Manager allows advanced users to manually configure resource settings to resolve conflicts between devices.
What is the difference between Device Manager and Control Panel?
Device Manager is used specifically for managing hardware devices connected to the computer, while Control Panel provides a broader range of system settings, enabling you to customize and manage system behavior.
Where is Device Manager located in Windows 10?
In Windows 10, Device Manager can be accessed through various methods. Here are some of the easiest ways to locate it:
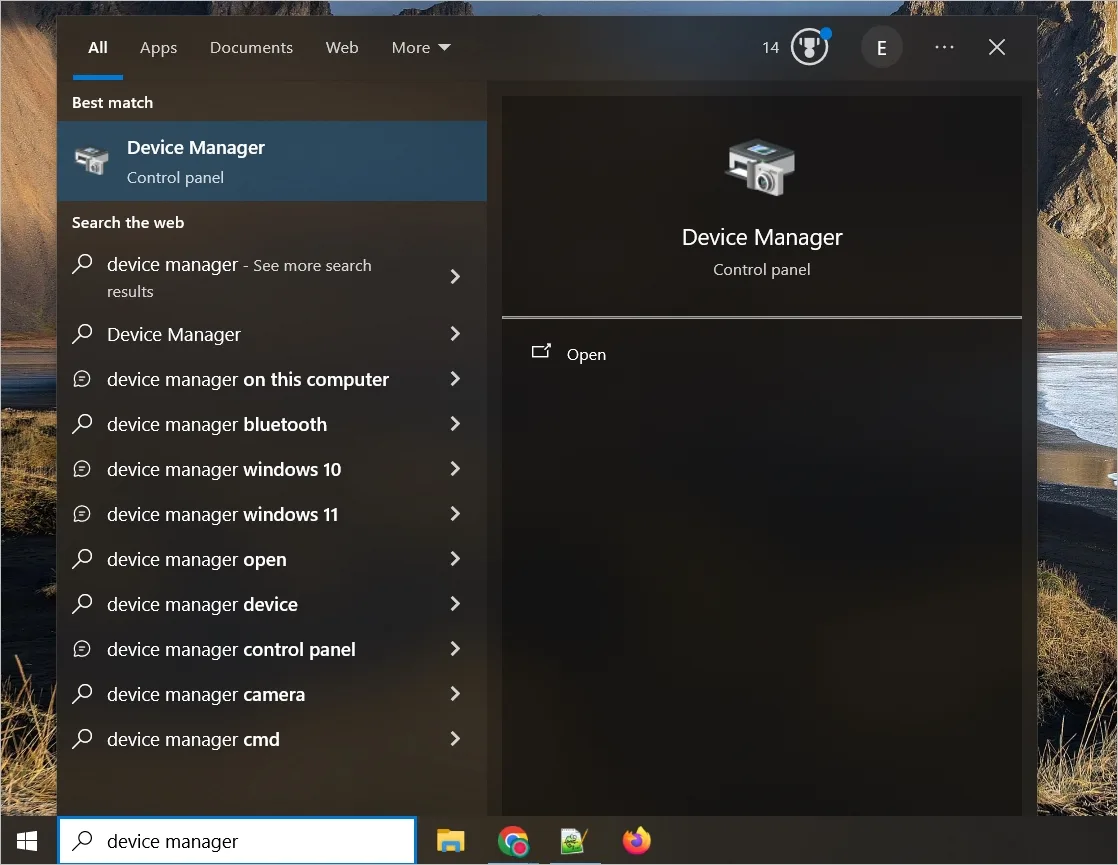
- Start Menu Search:
- Click on the Start Menu or press the Windows key.
- Type
device managerin the search bar. - Click on the Device Manager result that appears.
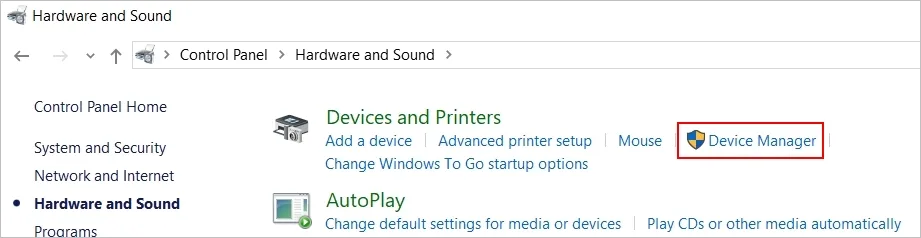
- Control Panel:
- Open the Control Panel.
- Choose Hardware and Sound.
- Under Devices and Printers, select Device Manager.
- Run command:
- Press Windows Key + R to open the Run dialog.
- Type
devmgmt.mscand press Enter.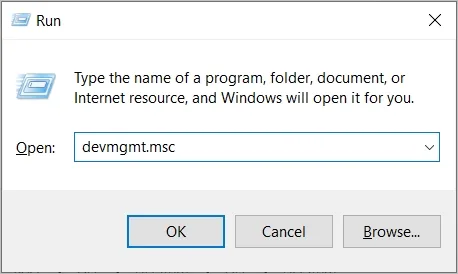
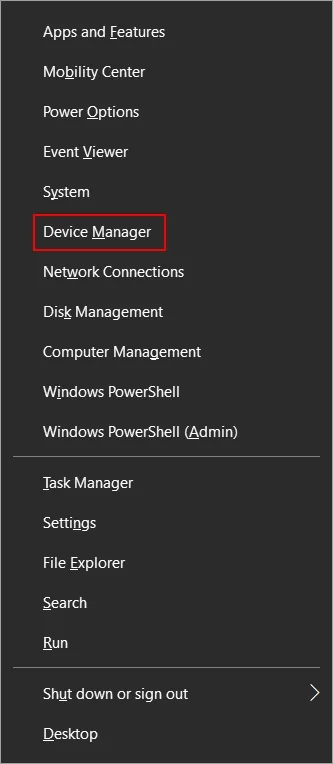
- Quick Access menu:
- Press Windows key + X to open the Quick Access menu.
- Select Device Manager from the list.
Does Device Manager show hidden devices?
Yes, Device Manager in Windows can show hidden devices. These hidden devices include:
- Non-plug and play drivers: Some system drivers that aren’t detected automatically as new hardware.
- Devices not currently connected: Devices that were previously connected but are currently unplugged or disconnected.
- Phantom devices: Devices that were not uninstalled correctly and may still leave entries in Device Manager.
How to view hidden devices in Device Manager
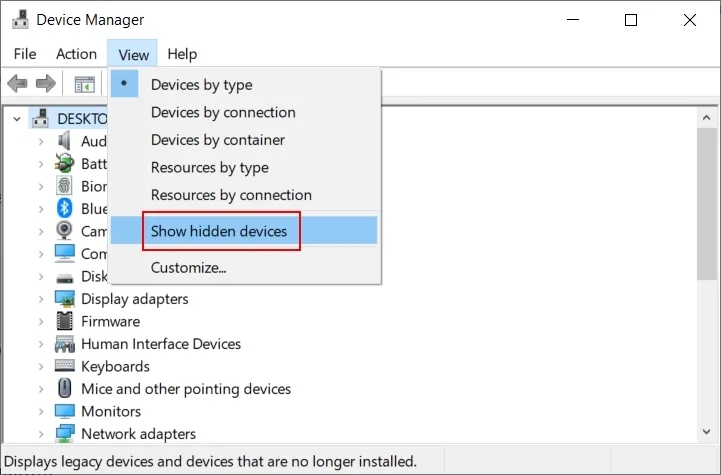
- Open Device Manager.
- Click on the View menu.
- Select Show hidden devices from the dropdown.
How to disable a device in Device Manager
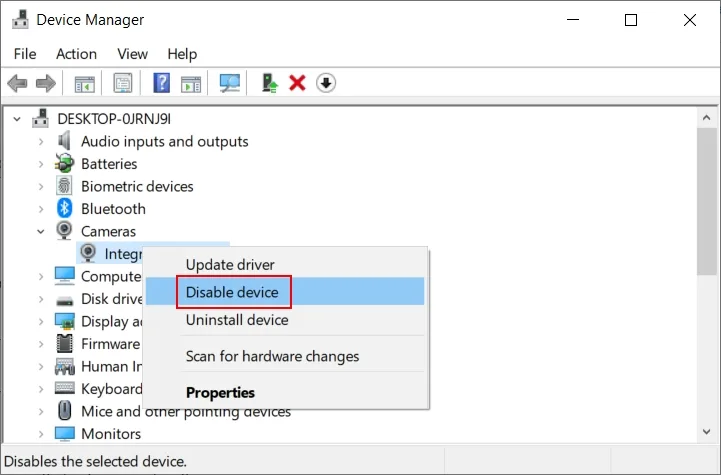
- Find the device to disable:
- Locate the category that contains the device you want to disable.
- Click the arrow to expand the category and see all devices under it.
- Disable the device:
- Right-click on the device you wish to disable.
- Select Disable device from the context menu.
- A warning message will appear asking you to confirm the action. Click Yes to disable the device.
- Confirm the device was disabled:
- Once disabled, the device will show a downward arrow indicating that it’s currently inactive.
If you need to re-enable the device, follow the same steps but select Enable device instead.
Note: Disabling a device will prevent it from functioning until you re-enable it. This method is useful for troubleshooting hardware issues or managing devices that are not frequently used.
Can Device Manager identify unknown devices?
Yes, Device Manager can help identify unknown devices to a certain extent. Here’s how it works and some steps to identify such devices:
- Check device properties:
- Open Device Manager.
- Look for any devices labeled Unknown Device or those with a yellow exclamation mark.
- Right-click on the unknown device and select Properties.
- Identify by hardware Ids:
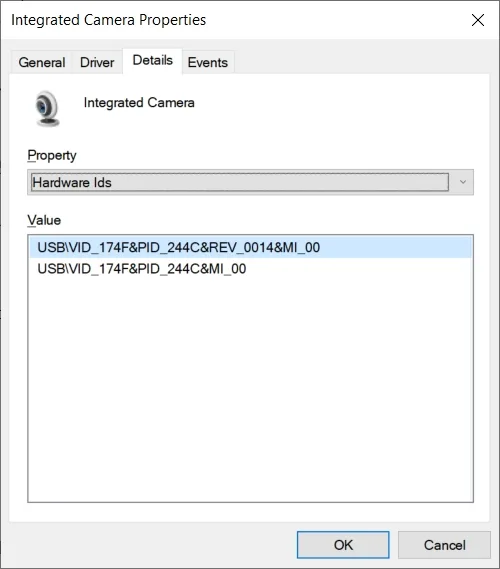
- In the Properties window, go to the Details tab.
- From the dropdown menu, select Hardware Ids.
- The value displayed contains identifiers that can be used to find information about the device.
- Search online:
- Copy the hardware ID from the Details tab.
- Use a search engine to look up the hardware ID. This often leads to forums or support pages where the device is identified, sometimes providing drivers or other troubleshooting tips.
- Windows Update:
- Windows Update sometimes includes drivers for unknown devices. Right-click the unknown device in Device Manager and choose Update Driver > Search automatically for drivers > Search for updated drivers on Windows Update.
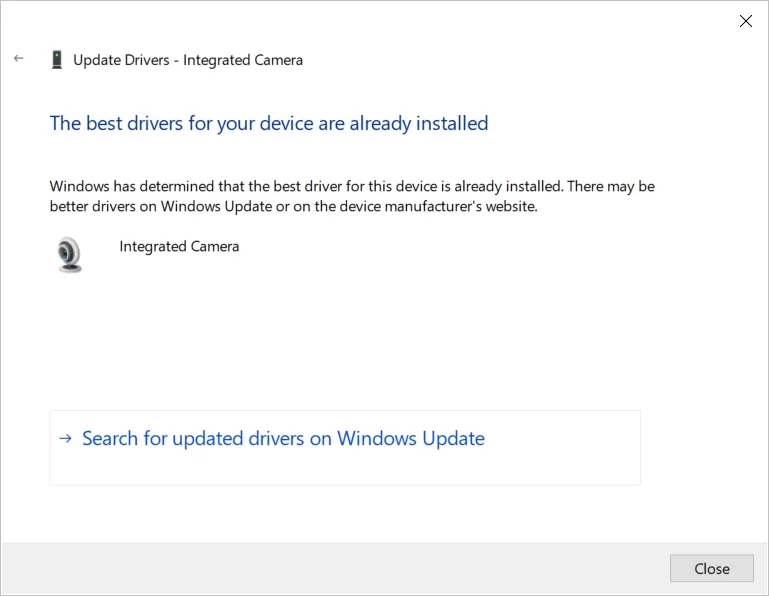
- Windows Update sometimes includes drivers for unknown devices. Right-click the unknown device in Device Manager and choose Update Driver > Search automatically for drivers > Search for updated drivers on Windows Update.
- Manufacturer support:
- Check the computer manufacturer’s website if the unknown device is built-in, or consult the component manufacturer for additional drivers.
Why is Device Manager showing an exclamation mark?
An exclamation mark (usually inside a yellow triangle) in Device Manager indicates that there is a problem with the device. Common reasons for this error include:
- Missing or outdated drivers: The device may require a new driver or an update to function properly.
- Corrupt drivers: Sometimes, installed drivers become corrupted, which can cause the device to malfunction.
- Resource conflicts: Devices might have conflicts over system resources such as IRQ lines or memory addresses, preventing them from working properly.
- Disabled device: The device could be switched off in Device Manager. Re-enabling it might resolve the problem.
- Hardware issues: The device itself could be physically damaged or improperly connected, resulting in an error.
- Compatibility issues: Some devices may not be fully compliant with the version of Windows you’re using, requiring additional driver or software support.
How to troubleshoot the Device Manager exclamation mark
- Right-click the device with the exclamation mark and choose Properties.
- In the General tab, check the error message next to Device Status. It often includes an error code with details on the problem.
- Depending on the error code, you may try:
- Updating or reinstalling the device driver.
- Checking for conflicts via the Resources tab (if applicable).
- Disabling and re-enabling the device.
- Removing the device physically and reconnecting it.
Can I reinstall drivers using Device Manager?
Yes, you can reinstall drivers using Device Manager in Windows. Here’s how you can do it:
- Locate the device:
- Find the device whose driver you want to reinstall. Devices are grouped by categories (e.g., Network adapters, Display adapters).
- Uninstall the driver:
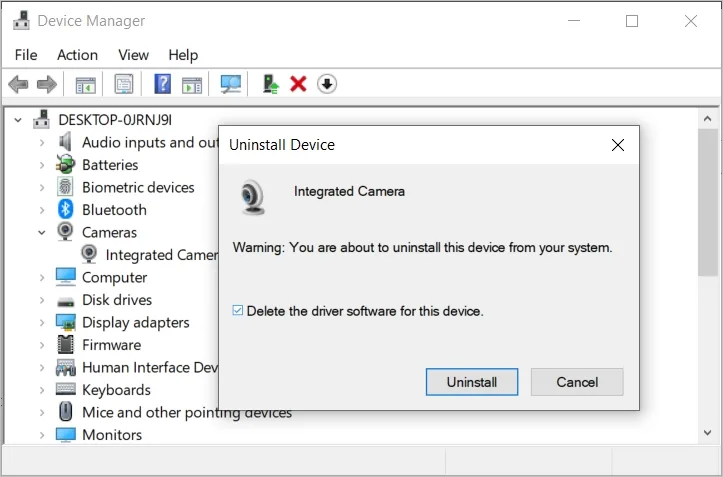
- Right-click on the device and select Uninstall device.
- In the confirmation dialog, you can check the option Delete the driver software for this device if you want to completely remove the driver files.
- Click Uninstall.
- Reinstall the driver:
- After the uninstallation, restart your computer.
- Windows will attempt to automatically detect and reinstall the driver.
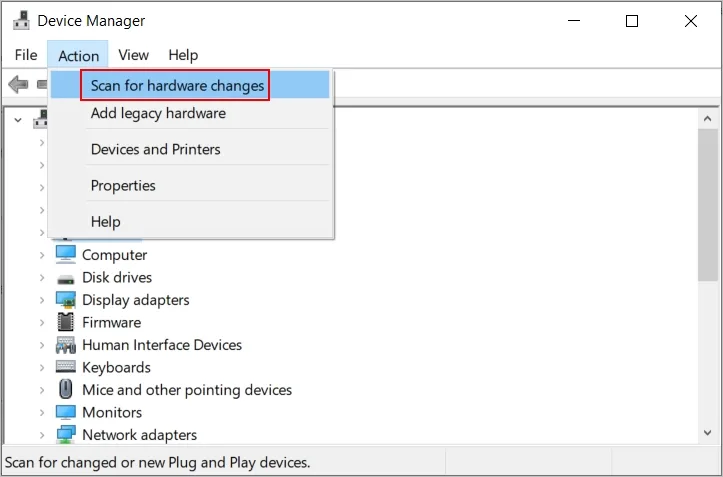
- If it doesn’t, you can right-click on the device category (or root node or Action menu) in Device Manager and select Scan for hardware changes to force detection.
- Alternatively, download the latest driver directly from the manufacturer’s website and install it manually.
Does Device Manager update drivers automatically?
Device Manager itself doesn’t automatically update drivers on a scheduled basis. However, it provides an option to update drivers manually or search for updates online. You can use driver update software or Windows Update since it can handle some driver updates automatically as part of the regular update cycle.
To ensure Windows Update is configured to run driver updates automatically:
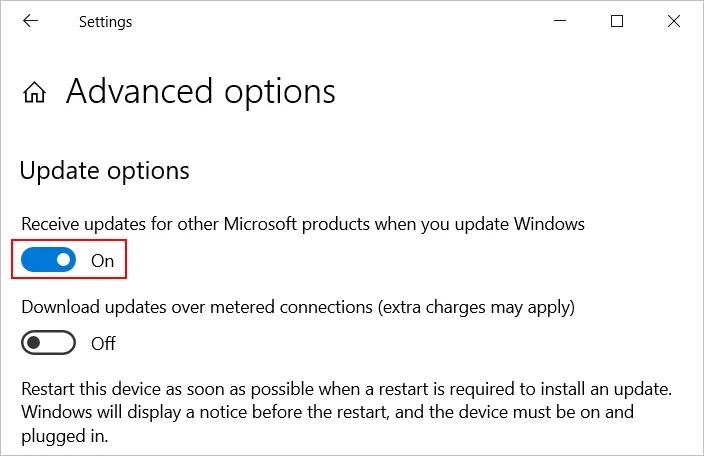
- Go to Settings > Update & Security > Windows Update.
- Click Advanced options.
- Ensure that Receive updates for other Microsoft products when you update Windows is checked.
How to resolve conflicts by reassigning resources in Device Manager
Resource management in Device Manager involves overseeing system resources like memory, IRQ (Interrupt Request), and DMA (Direct Memory Access) channels, which devices require for communication and data transfer. Device Manager helps you identify potential conflicts and reassign resources to resolve issues, improving device compatibility and performance.
- In Device Manager, expand a device category to see a list of connected devices.
- Right-click the problematic device and choose Properties.
- On the Resources tab, look for any conflicts or shared resources marked with a warning or error message.
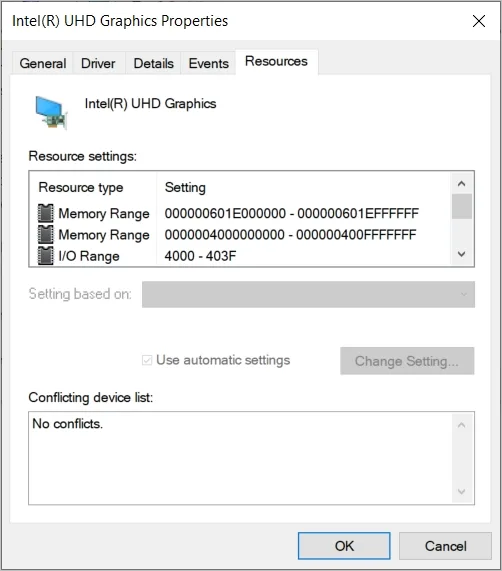
- Check the Settings Based On option or manually modify specific resource values.
- Enable Use automatic settings or disable it to manually assign IRQ, DMA, or memory values.
If the Settings based on and Use automatic settings are greyed out, it means you can’t make any modifications here.
Note: Modern devices often handle resource assignments automatically through Plug and Play. Manually assigning IRQ, DMA, or memory settings is typically used for older hardware or when automatic settings fail to resolve conflicts. This process requires caution and, often, technical expertise, as incorrect settings can lead to more severe system issues.
How to identify and fix device errors using Device Manager
Error codes and descriptions
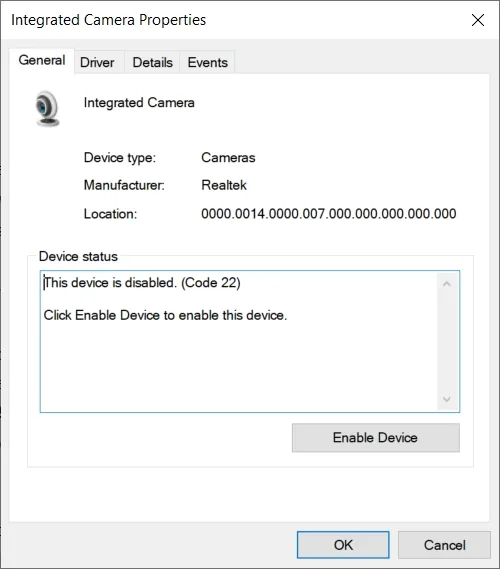
Device Manager displays error codes and descriptions that offer insight into the specific problems affecting devices. Each error code corresponds to a known issue, which can be referenced in Microsoft’s knowledge base for detailed troubleshooting steps.
Common Device Manager error codes and descriptions are:
- This device cannot start (Code 10): Indicates that a device driver could not be started, often due to a driver corruption or compatibility issue. Try updating the device driver.
- The drivers for this device are not installed (Code 28): Signifies that the driver is not installed, which could happen after connecting new hardware or reinstalling Windows. Try reinstalling the device driver.
- Windows has stopped this device because it had reported problems (Code 43): Appears when Windows stops a device because of a reported problem, possibly related to driver malfunctions or hardware failure. Try reinstalling the device driver or unplugging and replugging the device into your computer.
Device status indicators
Devices with issues are highlighted using icons to denote their status:
- Red X icon: Signifies that a device is disabled. A disabled device isn’t currently active and won’t function until it’s re-enabled. Sometimes, a device gets disabled due to misconfiguration or system updates. If you’re at work or sharing the PC with someone else, the network administrator or the other user might have deliberately disabled the device for troubleshooting or to prevent conflicts.
- Yellow exclamation mark icon: Indicates a device error. The device has a problem that is affecting its operation, which could be caused by a faulty driver (missing, outdated, or corrupted), conflicting resource allocation (such as IRQ lines or memory addresses), or hardware malfunction.
- Blue i on white field icon: Means that a device’s manual settings have been adjusted from the default. It doesn’t necessarily mean there is a problem, but it flags devices with custom configurations.
Integration with other diagnostic tools
Device Manager in Windows works alongside other diagnostic tools to provide comprehensive hardware management and troubleshooting.
- Event Viewer: When Device Manager detects a hardware issue, such as a malfunctioning driver or device, it generates a system event, which is logged in Event Viewer under the System category. The logs in Event Viewer provide detailed error messages and timestamps that can help pinpoint when a problem started. Some logs may reference specific error codes that correspond to those found in Device Manager.
- Performance Monitor: Can be helpful in diagnosing hardware performance issues flagged by Device Manager. You can set up data collector sets to record performance data over time, which is useful for analyzing trends that relate to hardware issues. Plus, specific counters track performance metrics of individual hardware components, like network adapters and disk drives.
- System Information (
msinfo32): Provides more detailed information about hardware than Device Manager alone, including IRQ assignments, shared resource usage, and detailed driver versions, which can help identify conflicts or outdated drivers. - Windows Memory Diagnostic: Specifically checks the system’s RAM for errors, which may not be immediately apparent in Device Manager. The tool runs on reboot, checking for faulty memory modules and logging results in Event Viewer.
How to use Device Manager and Event Viewer
- Identify issues in Device Manager:
- When Device Manager flags a device with a yellow exclamation mark or another status indicator, it’s essential to understand the root cause.
- Check the device’s Properties for the error code and brief message about the problem.
- Find related events in Event Viewer:
- Open Event Viewer to locate more detailed information about the device issue.
- Check the System log for warnings, errors, or informational messages related to the device in question.
- Look for events labeled Driver, Device, or other relevant keywords, which may have event IDs and source identifiers.
- Analyze events:
- Review the event details, which might contain additional context like specific error messages, timestamps, or actions taken.
- Event Viewer can reveal intermittent issues that might not always appear in Device Manager, such as temporary disconnections, driver restarts, or performance problems.
- Correlate and troubleshoot:
- Cross-reference the error code from Device Manager with events in Event Viewer.
- The detailed event descriptions can point to specific driver problems, conflicts with other devices, or even power supply issues.
- Use the event timestamps to see if issues coincide with specific system changes, Windows updates, or new software installations.
- Apply fixes and monitor:
- Based on the information gathered, update drivers, reassign resources, or replace faulty devices.
- Continue monitoring in both tools: Device Manager should show updated status, and Event Viewer should indicate whether errors persist or have been resolved.
How to use Device Manager and Performance Monitor
- Identify a problem in Device Manager:
- Suppose Device Manager shows a device with a yellow exclamation mark, indicating a problem.
- You might notice that a specific hardware component, like a network adapter or GPU, is flagged due to driver issues or hardware malfunctions.
- Analyze impact using Performance Monitor:
- You can open Performance Monitor to observe how this problem affects the system’s performance. For instance, if a network adapter is malfunctioning, you might monitor network throughput or packet losses.
- Set up counters for CPU, disk, or memory usage to see if the problematic device affects other system resources.
- Correlate information:
- By correlating the timing of spikes in resource usage in Performance Monitor with the issues flagged in Device Manager, you can better understand the impact of hardware problems.
- This is particularly useful for intermittent issues that aren’t constant but have significant performance implications when they occur.
- Adjust settings or update Drivers:
- Back in Device Manager, you might attempt to resolve the issue by updating drivers, disabling or enabling the device, or changing its resources.
- After making changes, you can again use Performance Monitor to assess whether the performance of the system has improved.
How to use Device Manager and System Information
- Identify device problems in Device Manager:
- Start by checking for problematic devices in Device Manager. Look for error icons (yellow exclamation marks, red Xs) and error codes to get a preliminary understanding of the issue.
- Verify device details in System Information:
- Open System Information (
msinfo32) and look under relevant sections like System Summary or Components to find more comprehensive data about the problematic device. - Check for resource conflicts under Hardware Resources, which can display conflicts or sharing of IRQs, DMA channels, or I/O ports.
- Open System Information (
- Check driver information:
- Under the Components section, look at the Problem Devices and Signed Drivers subsections to find the specific driver status and signing details.
- Compare driver versions and signing statuses with those shown in Device Manager, confirming if an outdated or unsigned driver could be causing the issue.
- Cross-reference with installed programs and software:
- The Software Environment section shows installed programs, startup programs, and running services. Some software might interfere with hardware devices.
- Compare this information with Device Manager’s findings to identify any conflicting software that may require updating or removal.
- Troubleshoot and monitor:
- Once you’ve gathered sufficient information from both tools, proceed to update or reinstall drivers, disable conflicting devices, or change resource allocations.
- After applying fixes, monitor both Device Manager and System Information for improvement.
After manually adjusting resources via Device Manager or the BIOS, the conflict resolves, and the USB device starts functioning normally.
How to use Device Manager and Windows Memory Diagnostic
- Identify memory-related issues in Device Manager:
- Start by checking Device Manager for devices showing error codes or malfunctioning.
- If errors indicate possible memory-related issues (like frequent system crashes, unexplained application errors, or devices failing to start), consider testing the RAM directly.
- Run Windows Memory Diagnostic:
- Press Windows key + R, type
mdsched.exe, and press Enter. - Choose whether to restart immediately or schedule a test on the next reboot.
- When the system restarts, Windows Memory Diagnostic will automatically begin testing. This can take some time based on the memory size and test type.
- Press Windows key + R, type
- Analyze test results in Event Viewer:
- After the system reboots, log back in and open Event Viewer by pressing Windows key + R and selecting Event Viewer.
- In Event Viewer, go to Windows Logs > System and search for entries with the source MemoryDiagnostics-Results.
- If errors are detected, the logs will indicate whether specific memory locations are faulty.
- Cross-reference with Device Manager:
- If the memory test identifies errors, return to Device Manager and consider whether any error codes or malfunctioning devices align with memory issues.
- Memory problems can affect various components, leading to inconsistent or seemingly unrelated errors in Device Manager.
- Take corrective actions:
- If memory issues are found, test individual memory modules by removing them one by one to isolate the faulty one.
- Replace or upgrade the defective RAM as needed to restore system stability.
- If memory issues are not the root cause, consider other hardware or software troubleshooting based on the error codes from Device Manager.